
Christie
AW3 Platter Tweeking
The following tips are a collaberation from our own testing as well
as reader's input specifically for the Christie AW3 platters.
Although we have tested everything herein and found the following tips
to be of excellent advice, these tips are not endorsed by Christie Inc.
and are provided for your assistance "at your own risk".
PLEASE NOTE: There are
many images on this page.
Should they not all download
properly, hit your reload button.
Proper platter operation is very simple, yet for the uninformed can be
a nightmare. Film breaks, thrown prints, brain wraps...it can all
be enough for someone to wish the reel to reel days weren't over.
Yet it all boils down to two things, the the calibration of the machine
and the operator.
THE CALIBRATION
In this discussion we will be using the Christie AW3 platter, as it is
the best, most frequently found design and has the most versatile tweeking
capabilities. Note: the techniques herein are not standard
methods of calibrating the AW3. They are not endorsed by Christie
Inc. The techniques detailed below are assuming the machine is in
good functioning order. Although this is how we calibrate them, users
do so at their own risk.
For the calibration process, you will need a set of standard allen wrenches,
a multimeter, flat head screwdriver, a phillips head screwdriver and a
15/32 wrench (for removable brain versions).
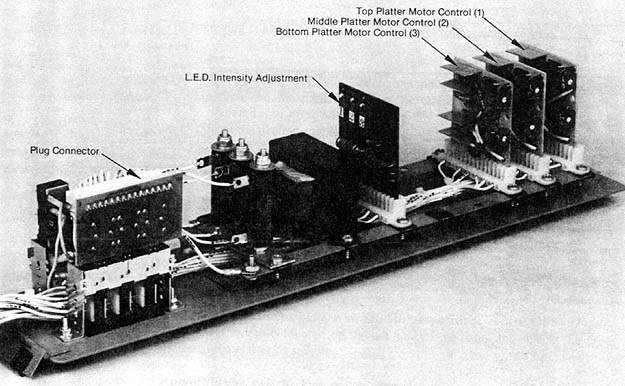
SETTING THE LED INTENSITY
Note: picture follows the description for reference.
Turn the power off to the AW3.
Remove the top platter motor speed control card.
Insert test probes into pins 12 and 14 of the motor speed card connector.
Turn the power on to the AW3.
Set the feed control arm to full throttle (100 degrees) and hold in
place.
Read the resistance across pins 12 and 14. Set the resistance
to 25K ohm by turning the appropriate LED intensity adjustment potentiometer.
Note: clockwise will decrease resistance, counter-clockwise will
increase resistance.
Repeat the steps above for the lower two decks. Note: turn
off the power to the AW3 before removing test probes.
CALIBRATING THE MOTOR SPEED CONTROL CARDS
Set the feed control arm to 20 degrees and adjust the LOW platter speed
on the apropriate motor control card so that the platter turns 1/4 turn
per 15 seconds. If you cannot get your platter to spin slow enough
with the LOW pot turned all the way down, the led assembly probably needs
to be replaced.
Set the feed control arm to full throttle (100 degrees) and adjust the
HIGH platter speed on the appropriate motor control card so that the platter
turns between 5 3/4 to 6 revolutions per 15 second intervals.
Verify the platter does NOT have a "punch" in speed when slowly moving
the feed arm from 0 degrees to full throttle. If it does, the LOW
adjustment is set too low. This is crucial to keep longer prints
from getting thrown.
Repeat for the other platters.
ADJUSTING THE FEED ARM SPRING
This adjustment will stop the dragging of the film around the back
side of the brain during the first part of the movie and ensure the feed
control arm to "float" smoothly during it's travel.
Removable brain prodedure
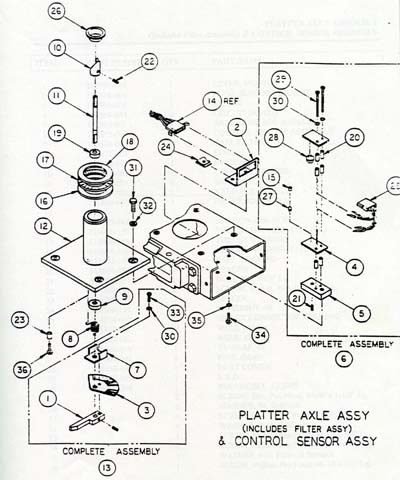
Note: explosion drawings follow the descriptions for reference.
Remove the brain.
Remove the platter deck, being careful not to pull the two thrust washers
and thrust bearing off of the platter axle shaft (#16, 17, 18).
Remove the 4 screws securing the platter axle to the arm (#12).
Carefully remove the entire assembly (#12, 9, 8, 13) by pulling upward
at an angle and take over to a well lit work bench.
The control arm spring (#8) is set typically two revolutions "too" tight.
Sometimes one revulotion will be ideal, while other times it may take four
unwinding revolutions depending on the age of the machine. Note:
if this is an older machine and the spring is in less than ideal condition,
you will need to replace them completely. The part number is #193877-001.
Obviously, you will need three for every platter system.
To loosen the spring, the easiest method is to take a small allen wrench
and work the curled end through the filter cam (#7) backwards, to lessen
the backpull tension. If so desired, the filter cam (#7) can be removed,
but at the expense of having to completely re-guess the setting.
We do not recommend that method. Note: loosen/tighten the spring
in half turn increents using the two flanges of the filter cam (#7) as
stoppers.
Once loosened, insert a brain into the axle and hold level checking
for a very slow pull of the feed arm from full throttle (100%) to full
stop (0%). This will approximate the final "in platter" setting,
although you will find it to be a little off. Adjust until the setting
is approximate.
Reinstall the entire assembly (#12, 9, 8, 13) back into the arm by tilting
downward at an angle. You will be able to hear and feel when the
assembly is back in and seated properly.
Insert two of the original four screws that secure the platter axle
to the arm (#12). They need not be tight at this point. They
are only there to achieve proper alignment.
Insert a brain into the newly adjusted axle. Note: the platter
need not be on. Hold the feed control arm at full throttle (100%)
and then gently let go and time it's pull back to full stop (0%).
It should take between 1 1/2 to 3 seconds to return all the way to full
stop (0%). Note: 2 full seconds is ideal. There should
NOT be a definite "snap" back to full stop (0%).
If all checks out, install the other two screws and tighten all four
down securely and repeat the test in the paragraph above. Note:
some platter arms are machined slightly different than others and you may
find that the test works perfectly with the axle is not tightened down,
but the arm "freezes" midpoint during it's travel when the screws ARE tightened
down. Remove and retighten the spring (#8) one half revolution...or
if possible, test to find out which screw causes the arm to freeze and
don't tighten that one down fully.
Stationary brain procedure
Note: explosion drawings follow the descriptions for reference.
Remove the brain by first removing the screw that holds the half circle
shaped dust shield in place. Note: this screw is located right
behind
the stationary guide bars (the two white stationary stripper rollers in
the center of the brain).
Next, remove the feed control arm by unscrewing the screw at the back
end of the feed control arm.
Finally, remove the actual brain plate assembly by removing the two
mounting screws in the center of the round black base plate. The
remainder of the brain can now be lifted straight up and off of the platter.
The control arm spring (#8) is set typically two revolutions "too" tight.
Sometimes one revulotion will be ideal, while other times it may take four
unwinding revolutions depending on the age of the machine. Note:
if this is an older machine and the spring is in less than ideal condition,
you will need to replace them completely. The part number is #193877-001.
Obviously, you will need three for every platter system.
To loosen the spring, the easiest method is to take a small allen wrench
and work the curled end through the filter cam (#7) backwards, to lessen
the backpull tension. If so desired, the filter cam (#7) can be removed,
but at the expense of having to completely re-guess the setting.
We do not recommend that method. Note: loosen/tighten the spring
in half turn increents using the two flanges of the filter cam (#7) as
stoppers.
Once loosened, reattatch the feed control arm and hold the feed control
arm at full throttle (100%) and then gently let go and time it's pull back
to full stop (0%). It should take between 1 1/2 to 3 seconds to return
all the way to full stop (0%). Note: 2 full seconds is ideal.
There should NOT be a definite "snap" back to full stop (0%).
If all checks out, remove the feed control arm, reinstall the brain
plate, reinstall the feed control arm and reinstall the dust shield...in
that order.
ADJUSTING THE STATIONARY GUIDE BARS
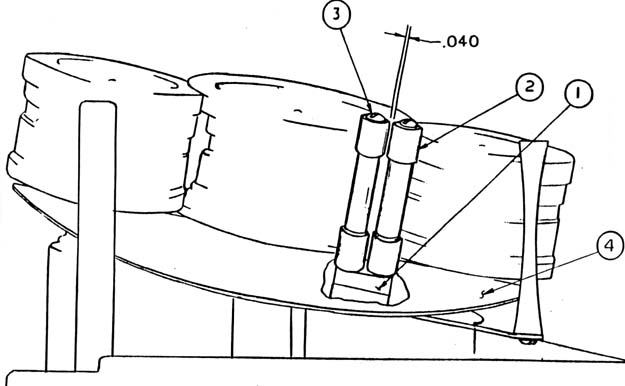
Note: drawing follows the description for reference.
For some reason, these are always too close to each other (#2, 3).
When they are "too" close, they will collect dirt and redeposit them at
splices, tug against the pull of the projector causing DTS digital to wow
or drop out, and in extreme cases scratch the film!
The procedure is the same for either removable or stationary brains.
Remove the dust shield holding the stationary guide bars. Loosen
the two screws securing the stationary guide bars to the dust shield.
While partially inserting a finger or pen between them...spreading them
away from each other as far as possible, tighten them down.
Reinstall the dust shield.
Now, with film running verify ONLY the sprockets are touching the stationary
guide bars. Some brains (depending on vintage) will ride "low" and
scratch the non-soundtrack edge of the picture, assuming the soundtrack
is up on the platter (projected right side). If this is the case,
remove the three brain roller shafts and place a small, thin washer under
each roller shaft. Reinstall the rollers and run more film to verify
the correct height of the rollers to the stationary guide bars. If
necessary, repeat intalling a second small washer. Note: typically
one washer will do, however we have on occasion needed to place two below
the shaft for proper alignment.
ADJUSTING THE FEED TENSION STOP SPRING
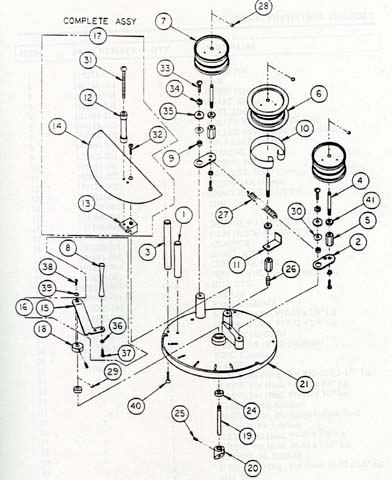
Note: explosion drawing follows the description for reference.
We are referring to the spring in the center brain roller (#10).
We do not adjust this at all. We have found the back tension from
the brain to be too great regardless of the amount of grease on the spring
and can stretch one side of the film if any of the rollers are slightly
off line with each other. Our solution is to remove it completely.
Allowing the center brain roller to spin freely works perfectly as long
as the platter to projector distance is no greater than about 15 feet.
Should this distance be greater, a ceiling mounted "helper" roller halfway
during it's travel is always our preferred solution. Note:
a "helper" take up roller will not be necessary.
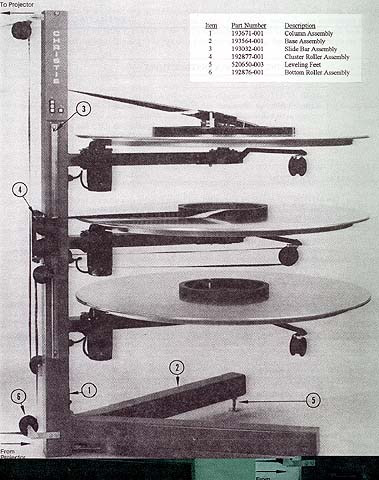
ADJUSTING THE SLIDE BAR ASSEMBLY
Note: picture follows the description for reference.
At the top and bottom of the slide bar (#3) you will notice some form
of screw. The newer ones have allen heads. If yours does not
have allen heads, we highly recommend a trip to the local hardware store
and the originals be replaced.
Loosen the lower screw slightly and don't worry about it for now.
Loosen the upper screw and adjust the bar as high as it will go.
Run film on to the top platter. Slowly adjust the bar downward until
the film just barely touches the take up platter as it stands straight
up and no lower. In essence, the bar should be as high as possible
with the film laying flat and smooth on the take up platter.
Run film on to the middle platter. Verify the film lays flat and
smooth on the take up deck. If not, lower the bar slightly so that
it does, but no further.
Repeat the above paragraph for the lower platter.
Don't forget to go back and tighten the lower screw once you are satisfied
with the alignment.
Diagonal scratches typically come from this adjustment being "too low"
and the film scrapes along the edge of the platter deck while it takes
up...the end result being diagonal scratches! Note: these type
of scratches can also happen from loading or unloading a film with the
adjustable roller on the make up table being too low also! Make sure
all film handlers watch this carefully.
BUFFING THE PLATTER DECKS
Does your theater use film clamps? If so then the actual surfaces
of your platters are probably pretty scuffed up. The action of angling
the film clamps downward into the deck in order to try and get the clamps
under the film almost always scratches the surface of the platter.
These scratches typically have rough spots where tiny bits of aluminum
stick up from the surface, causing the film to snag on them and the end
result is a thrown print. Plus, with the polyestar prints in use
today, a smooth platter will sling the film off center, and sometimes off
the edge. The purpose of buffing is to "roughen" up the decks and
make "grooves" in them, just like grooves help keep a car on the road when
wet. An added benefit of this is the "shiny" and "like new" appearance
of the decks.
You will need sandpaper (120 and 220 grits) in 8 1/2 x 11" sheets.
One sheet per deck. Note: lower cost contractor boxes of these
are typically available at Home Depot type hardware stores. Also
needed is a sanding sponge (9x1") also available from the same outlets.
Finally, I prefer "ValueChoice" wipers (available from larger paper suppliers)
as they are extremely plush, thick and durable versions of paper towels.
Regular paper towels will not work sufficiently for this purpose.
Note: do not buff the platters while film is in operation as the
flakes will damage the print being run. Also, remove all film from
the other two decks and place away from the platter to be buffed.
Remove your platter dust covers from the area as well. If you have
a projector mounted cleaner, remove it too.
Remove the brain from the platter deck to be buffed.
Attach the make up table and start the platter "loading" at full throttle.
Take a sheet of the 120 grit 8 1/2 x 11" sandpaper and wrap it around
the 9x1" sanding sponge. (Note: although the measurements are
1/2 inch difference, we find they line up nicely. Some trimming of
the sanding sponge may be necessary, as it should not extend beyond the
sandpaper.) With the platter running, start at the center of the
platter, applying light pressure, SLOWLY start moving outward to the edge
of the platter. Remember, apply LIGHT pressure. The idea is
to take off the glaze and smooth out the protruding rough spots.
Do not try to remove the deep scratches, you don't want to sand "through"
the deck! Take your time. A good pace will typically take a
solid minute or so.
Wipe the platter off with the ValueChoice or similar disposable wiper.
Repeat the above procedure with the 220 grit.
Wipe the platter off with the ValueChoice or similar disposable wiper.
Note: you may need to go through several "cleanings" of the platter
decks before all the shavings are wiped off. We do not recommend
using any kind of liquid cleaner on the surface of the platter as it will
promote glazing of the surface, defeating the purpose of the buffing.
Repeat these procedures for the other two platter decks.
Now aren't they shiny and like new?
THE OPERATOR
BASIC POINTS TO REMEMBER
*Always run the soundtrack edge of the film UP on the platter.
Most damage to platter-run prints happens due to running the soundtrack
edge down, against the platter surface. Running the film soundtrack
edge UP keeps the potential abrasiveness to a slightly misaligned platter
down to an absolute minimum and also stops "faulting" of the print.
Running UP keeps the emulsion side away from the brain in the event of
dragging and keeps the emulsion away from the platter surface on takeup...eliminating
the possibility of colored diagonal scratches. It will also feed
smoother into the brain on payout.
*Always run the emulsion side of the film on as many of the rollers
as possible. So long as the rollers are spinning, there is no worry...and
even if one were to seize up, they are beveled inward and would still not
scratch the film. In short, don't be afraid of running the emulsion
on them. The base side of the film carries the dust and dirt.
That dirt gets deposited on the rollers. The dirt on the rollers
gets redeposited on the film. It is a never ending process.
By running the emulsion on as many rollers as possible, this is drastically
cut down, and prints will stay cleaner, longer. An added benefit
is the lack of having to twist and turn the film back and fourth in that
"old style" approach.
The following descriptions are assuming the platters are at a slightly
turned angle with the closest platter leg "parallel" to the side of the
lamphouse. The proper direction of the film should be as follows:
Left side platters (on non-operator side of projector).
Thread the film through the brain and toward the platter tree, twisting
the film so that the soundtrack is against the tree. Follow the threading
pattern down to the lower roller and on the way back up, twist the film
so the soundtrack is again, against the tree (or away from the screen).
Keep the soundtrack AWAY from the screen all the way TO and FROM the projector.
(Bypass the projector at this point.) Upon returning to the platter,
you will once again notice the soundtrack will be towards the tree.
Continue threading with the soundtrack towards the tree all the way to
the take up platter. Now return to the projector and thread it, being
careful not to allow any film to touch the floor. (Note: a
clothespin nearby is handy for this.)
Right side platters (on operator side of projector).
Thread the film through the brain and toward the platter tree, twisting
the film so that the soundtrack is against the tree. Follow the threading
pattern down to the lower roller and on the way back up, twist the film
so the soundtrack is away from the tree (or towards from the screen).
Keep the soundtrack TOWARDS the screen all the way TO and FROM the projector.
(Bypass the projector at this point.) Upon returning to the platter,
you will once again notice the soundtrack will be away from the tree.
Continue threading where the soundtrack turns towards the tree all the
way to the take up platter. Now return to the projector and thread
it, being careful not to allow any film to touch the floor. (Note:
a clothespin nearby is handy for this.)
We hope there has been something here on this page which will help
Christie equipment owners in achieving a better quality presentation.
If you know of any tips not presented here, please email them in to Flix@film-tech.com
so we may spread the knowledge to others.
If there are any further questions or comments, double check our site
(www.film-tech.com)
for recent additions or email us directly. We will try and do
our best to help.


